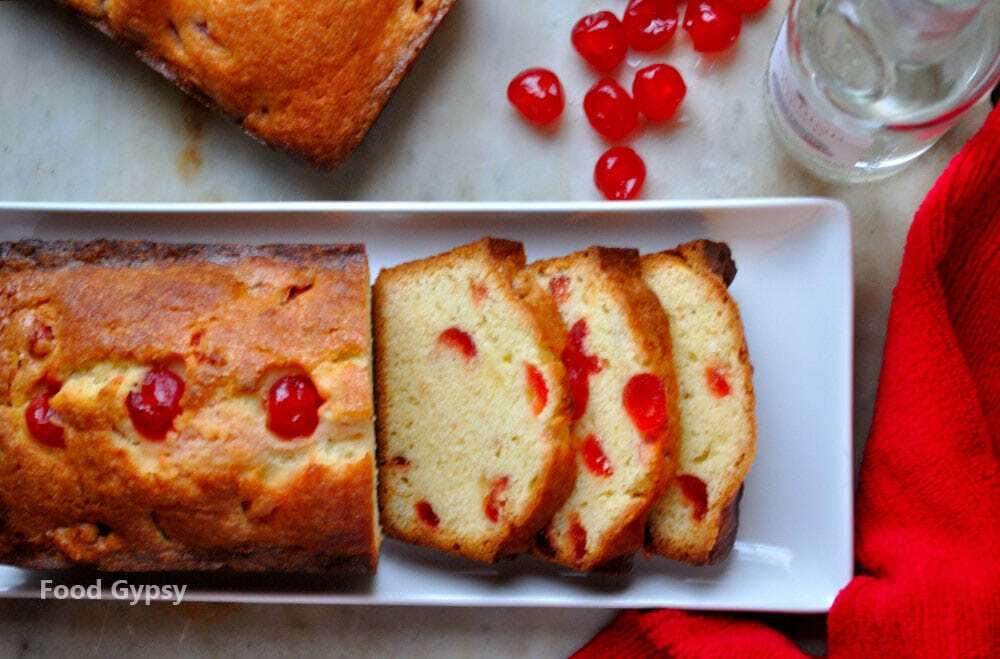
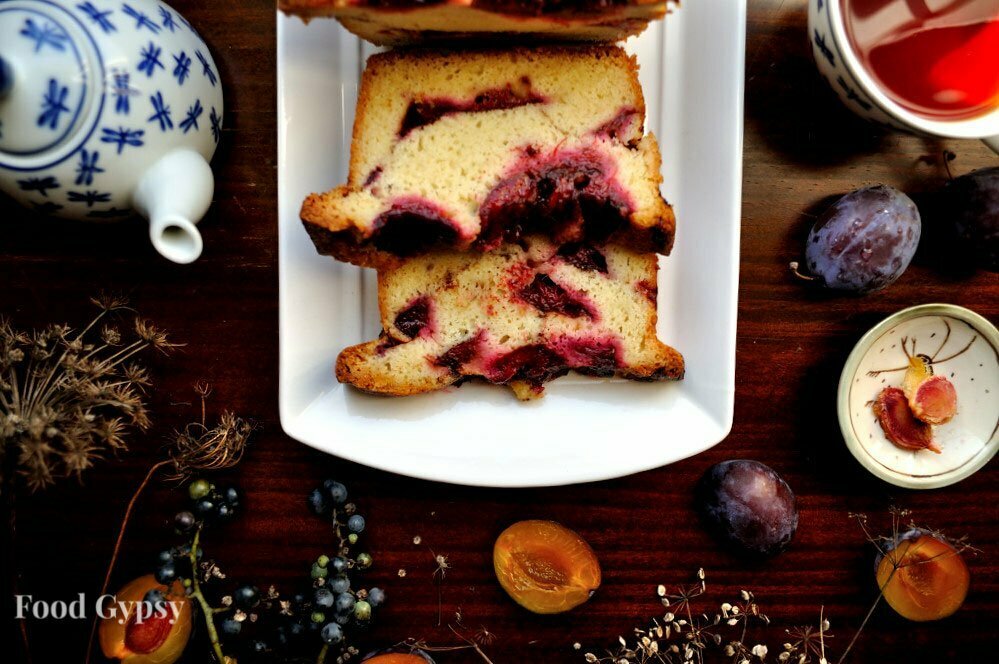
Posts Tagged ‘Cakes’


Chocolate Orange Chiffon Cake - Food Gypsy

An overwhelming desire for the taste of orange and chocolate led me down the slippery slope of recipe development, creating a deep, dark and delicious Chocolate Orange Chiffon Cake that thrilled neighbours and crushed that craving.

The neighbours love it when I bake. I then scurry around and distribute goodies lest they cling to my thighs.  (Judging by how my underwear fits, I may have left this cake in the Gypsy Kitchen a little too long.)

My hunger for citrus has been at a fever pitch; last week I found myself surrounded by oranges, kumquats, pomelo, Meyer lemons and several limes.  (I think I may have scurvy!)  The holiday season denied me one of my favourite candy treats (Terry's Chocolate Orange) so I had to bake now, didn't I?

Oh sure, I could have just eaten an orange and a piece of chocolate... but where's the fun in THAT?!

Keep the cake moistened with kumquat syrup and topped with colourful bits of candied kumquat (featured earlier this week on Food Gypsy).  I often use a simple syrup on a cake before icing, it helps keep it moist longer.  In this case, the juicy orange flavour of kumquats helped intensify the citrus undertones, but this cake is so moist and rich it hardly needs help.

Finished it with a chocolate ganache and that's when this Chocolate Orange Chiffon Cake took on a life of its own.  The planned 'thin drizzle' of ganache became great, goopy globs of rich chocolate.  Instead of a refined, delicate effect it became one big, chocolate meltdown.

Cake, ganache, candied kumquats - Food Gypsy


Sometimes you just have to roll with it... let the chocolate flow and learn something new.  What I learned was this:  finishing with a warm ganache in front of an open window, in temperatures of -18*C is not such a good idea.  Noted.

Didn't affect the taste one little bit... tangy, citrus backed flavour, grounded in rich, semi-sweet chocolate; a feel good combination.  

It must be, because now I feel GREAT, shame about my waist though.  Here one day, gone the next.  Meh, it'll be back.


Mix zest with dry ingredients - Food Gypsy Dissolve cocoa in the hot orange juice - Food Gypsy

Separate eggs - Food Gypsy Beat to soft peaks, then add sugar and beat to stiff - Food Gypsy

Add vanilla & oil to egg yokes, lightly mix - Food Gypsy Add egg mixture to coca mixture - Food Gypsy

Fold in egg whites - Food Gypsy Pour bubbly batter into un-greased tube pan - Food Gypsy

Chocolate Orange Chiffon Cake Recipe

(Adapted from Mennonite Girls Can Cook)

Prep time:  35 minutes
Cooking time: 60 - 70 minutes

1 1/2 cups orange juice, heated
3/4 cups cocoa powder
1 3/4 cups cake or pastry flour
1 1/2 cups sugar, divided
1 1/2 tsp baking soda
1 tsp salt
zest of two medium oranges (about a 1/4 cup)
1/2 cup vegetable oil
7 large eggs, separated
1/2 tsp cream of tartar
1 tsp vanilla

Method:

  1. In a small saucepan, heat orange juice to a low simmer.  Mix cocoa powder and hot orange juice together in a medium bowl, dissolving cocoa completely.  Stir well, and allow to cool to room temperature (about 10 minutes).
  2. In a large bowl combine flour, 1 1/4 cups sugar, baking soda and salt, add orange zest and toss to mix.  Add cocoa orange juice mixture to dry ingredients and mix until just blended. Do not beat.
  3. In a large bowl beat egg whites together with cream of tartar to form soft peaks.  Add remaining 1/4 cup of sugar to egg whites and beat until stiff.
  4. In a medium  bowl add vanilla and oil to egg yolks, lightly beat with a fork or whisk.  Add egg mixture to cocoa mixture, blend until just smooth, beating this batter will make it tough, so just mix until blended.   Add egg whites to cocoa batter, one quarter at a time, using a spatula and fold gently into the whites until everything is blended and bubbly.
  5. Pour into an ungreased tube pan and bake at 350º for 60-70 minutes.  (Ungreased! This cake has enough oil that it should not stick, and it needs the ungreased sides so that it can 'grip' and rise.)

Invert pan and allow to cool.  Remove to cake plate, you can plate either bottom (flat) side up or top (domed) side up.  Your choice.

Optional:  Once cooled lightly, coat cake with simple syrup or kumquat syrup (from our candied kumquat recipe), to help cake retain moisture.  Finish with chocolate ganache and decorate to please.


This is a cake that freezes well and keeps for up to a month.  You know, if you were planning your desserts that far in advance.

Chocolate Ganache Recipe

Prep time: 5 minutes
Cooking time: 5 minutes

1 cup heavy cream
4 ounces good quality milk chocolate, chopped into small pieces
5 ounces good quality dark chocolate, chopped into small pieces
2 tsp vanilla extract

Method:

  1. In a heavy sauce pan heat cream until just bubbling. Make sure you stay with it so it does not scorch or boil over, it only takes a couple minutes.
  2. Remove from heat, stir in chocolate until completely melted.  Add extract.
  3. Cool slightly until ganache begins to thicken, stirring occasionally.

Pour still warm, (thick) ganache over cake.  May the drizzle be with you.

Chocolate Orange Chiffon Cake in pan - Food Gypsy


Ice for Christmas - Food Gypsy

Instead of new years resolutions, for many years now I have given each year an overarching life theme to promote personal growth.

Resolutions focus on largely on external change, loosing weight, quitting smoking, eating healthy.  For me a theme takes the focus off the external and focuses on the internal.   Under each theme I have goals, objectives and desires but often times I find that the action organically materializes as a natural consequence of the inner shift, as I set my intent for another year well lived.

In 2010 the theme was "My Life From Scratch" and as soon as it was set, I sold my business, home, car and television and started again.  I traveled 30,000 miles, launched Food Gypsy, reunited with those I loved and pursued my wildest dreams.  I went to culinary school, moved to Ottawa and started over a new city; I created a whole new life, from scratch.

The theme for 2011 was "Bigger & Better".  I thought this meant more cuisine knowledge but quickly found that path was not for me.  Another of life's little twists came when the phone rang and a former (flirty) cuisine instructor asked me out ( here I thought he moved my scorching pans out of a love for butter).  My love life got bigger (and better), I moved to a bigger, better apartment with a bigger, better kitchen.  My career got bigger (as my skills got better) and when my found myself suddenly ill, I got better... while my pants got bigger. (One must be careful how one words these things.)

2011 was a year of challenges and overcoming challenge makes us bigger and better.

This holiday season as the snow fell outside, Chef B (former cuisine instructor, mover of scorching butter, love of my life, companion in the kitchen) produced a small box from under the tree.  He then proceeded to stammer though a disjointed speech that started with "Look, you're a good woman..."

There was some confusion as to what exactly was being asked "I was wondering if you would like to commit to this relationship for a very long time... with a ceremony in between" and what exactly the answer was, I was too distracted by the sparkly ring to reply.  One thing's for sure, life with us is never dull.

So.  Looks like I'm planning a wedding AND a move.  Thus the theme for 2012: "The Great Coming Together" --- an homage to that 'ceremony in between' and the gooey stuff that unites us all.   As usual, I think I have an idea where this will take me, but I've learned it will surprise in new and wonderful ways.  It always does.

The theme for the year was easy, the theme for the wedding is proving much trickier.  Themes that have (so far) been shot down in flames include:

My Big Fat, Gypsy Wedding.  "Think of the DRAMA!" Gypsy. "I'd rather not." Chef B.
The Star Wars Wedding.  "Use the force."  Gypsy.   "Over my dead body." Chef B.
The Nude Wedding, on a beach. "Double the flower budget..." Gypsy. "One word: SAND." Chef B.
The Star Trek Wedding. "Going where no man has gone before." Gypsy "OH MY GOD..." Chef B.
The Hillbilly Wedding, complete with John Deer tractor. "I loves me a tractor." Gypsy "Actually, I kind of dig that." Chef B.  What?  That was a joke...

Back to the drawing board on the wedding thing.  Let's think about the move first, we need a place with two kitchens.

Sharing my life with him is one thing but if he thinks I'm sharing a kitchen, he's got another thing coming.

Chef B & something sparkly - Food Gypsy

He got something shiny too...


Chocolate Espresso Truffle Cake - Food Gypsy

Smooth, dark and super rich, this Chocolate Espresso Truffle Cake is a slab of pure chocolate heaven.  It's also flourless so there's no pesky carbohydrates and it's gluten free.

Just a few simple ingredients you probably already have: butter, sugar, chocolate, espresso and eggs.  When baked it has the consistency of chocolate paté but some mistake it for a cheesecake.  (Yea, there's no cheese in that.)

Chocolate Espresso Truffle Cake is super simple, all you need is a bain marie or double boiler.  If you don't have one no worries, just do what I do, take a bowl on place it over a pot of simmering water.  The steam will heat the bowl and help to melt the ingredients together.  Just be sure the bowl does not touch the water.

Makeshift Bain Marie - Food Gypsy Reverse bottom of springform, Food Gypsy

Hot tip from our Technical Director, Chef B:  to make it easier to unmold, flip the bottom of your springfrom pan upside down, that way you don't have to deal with the lip on the bottom when you serve.  Before unmolding; run a hot knife around the sides to help loosen the torte from the sides then undo the buckle on the spring form pan and ease it out.

I also used a round of parchment on the bottom because I wanted to plate it on the cake stand.  Removing the parchment was tricky and I accidentally broke the cake.  Fortunately, I was able to mend it for the presentation, but between you and I --- if you use parchment, just leave it in place.

This recipe easily doubles, which means there's twice as much of it.  It may call you at 3AM for a bathrobe attired chocolate feast by the light of the refrigerator, it's temptation in it's purest form.  

You've been warned.

Chocolate Espresso Truffle Cake, Ingredients - Food Gypsy Melt over bain marie - Food Gypsy

Remove from heat - Food Gypsy Whisk eggs, off heat - Food Gypsy

Slowly add eggs & stir - Food Gypsy Consistency of chocolate custard - Food Gypsy

Add custard to prepared springform pan - Food Gypsy Remove from oven and cool - Food Gypsy

Chocolate Espresso Truffle Cake Recipe

1/4 cup sugar
1 cup butter
10.5 oz (*300 G) dark semi sweet chocolate, chopped
1/2 teaspoon vanilla
2/3 cup strong coffee/ double shot of espresso
4 eggs, beaten

2 teaspoons cocoa, to finish

Preheat oven to 325*.  Coat 6 inch springform pan with non-stick spray.

Method:

  1. In double boiler (or bain marie) over medium heat combine sugar, butter, chocolate, vanilla & coffee, stirring until all ingredients are melted. Remove from heat.
  2. In separate bowl whisk eggs until foamy, slowly add to warm chocolate mixture, stirring constantly to prevent eggs from cooking.  This will make the chocolate mixture thick, like a chocolate pudding.
  3. Coat 6" springform pan with non-stick spray.  If desired, cut a round of parchment to cover bottom of pan, place in pan before poring in prepared custard. Pour warm chocolate mixture into the pan and place on a baking sheet (in case of any leakage).  Place in a 325* oven, on the center rack and bake for 25 to 30 minutes.

Cooking time will vary depending on your oven (and how many times you peek), this torte will bake like a cheese cake, the sides rising while the center will remain soft and jiggly.  This is the consistency you're looking for.  I suggest checking the cake at 25 minutes and re-setting your timer on intervals of 5 minutes until you see the sides are firm and risen, and only the center jiggles when you gently wiggle the pan to test.

Remove and allow to cool.  Refrigerate, covered for two hours, then take hot knife and run it around the sides to free it safely from the sprinform pan.  Unbuckle springform and remove sides, if desired, you can also (gently and carefully) remove bottom and plate just on parchment.  Sprinkle with cocoa and plate.

Serve at room temperature, smear evenly on both thighs.

Chocolate Espresso Truffle Cake - Food Gypsy

Asian Gingerbread Pear Cake - Food Gypsy

A far east twist on a holiday favorite, Asian Gingerbread Pear Cake is slightly sweet, moist and intense with the bright addition of poached pears for a show-stopping, simple cake; the prefect fit for holiday entertaining.

Pear and ginger being such a stunning flavor combination, I looked at maybe a hundred different recipes and was leaning towards a Upside-Down Pear Gingerbread Cake when Food Gypsy Technical Director, Chef B, suggested I look at a recipe from Ricardo Larrivée.  My guy always has great ideas in the kitchen with 25 years of experience to back them up,  when he says "it's a cake I've been wanting to try" I go and check it out.

In his Pear Spice Cake, Ricardo features the full pear in a dramatic tone-on-tone cake that is subtle and beautiful.  Baked loaf style, each slice highlights the silhouette of the pear on the plate, to stunning effect.

Shopping for the perfect pear, these beautiful Chinese White  Pears caught my eye.   This Asian pear varietal is crisp and juicy with creamy white flesh, a slightly sweet taste and a hint of tartness near the centre.  Choosing them as my pear shifted my recipe direction as I began looking for a gingerbread with an Asian lean.

Chinese White Pears - Food Gypsy

Fortunately, I stumbled on this gem from the blog Blue Kitchen, Marion’s Gingerbread which they described as:  "Dark molasses, black pepper and Chinese five-spice powder make for big-flavored gingerbread with a spicy bite."  Huston, we have our gingerbread.

I pushed the pear poaching liquid with a hint of lemongrass, then reserved that to replace the boiling water in the original recipe adding a level of acidity to help marry the two flavours and heighten the spice.  The collaborative result was this dramatic, dark, rich, spicy cake in contrast to the mellow, creamy flesh of pear --- and a new personal best.

Gingerbread Pear Cake, icing sugar - Food Gypsy

The top maintains a wonderful slight stickiness, perfect to dust with a touch of icing sugar, and now, three days later it's still moist and holding it's goerogous shape.

A couple of notes from the Gypsy Kitchen before you dive in:  

  • First, I used a silicone pan so I didn't have to rely on the Magic of Christmas to get this sucker on a plate.  Alternatively, a piece of parchment to line the pan would be a good idea.  The pears weigh the cake down and I would hate to see it break after you've spent your precious time on it.
  • Second, Chinese White Pears are not essential, Bartlett pears will work just as well. Try to find three that are about the same height, shape and weight - so they cook evenly.
  • Third, I just love a recipe in which I must use my melon baller.  Just sayin'.

Asian Gingerbread Pear Cake being a less sweet version of gingerbread with a very adult, spicy back, a few serving suggestions for you:  sweetened whipped cream, vanilla ice cream or as you see below, a good, gooey caramel.  You may also wish to pair it with our Gingerbread Hot Chocolate because... it's like... FREAKIN' AMAZING.

Happy Holidays!


Remove pear seeds from bottom - Food Gypsy Pears, pre-poaching - Food Gypsy Pears, poached - Food Gypsy

Asian Pear Gingerbread, spicing - Food Gypsy Adding molasses mixture to dry ingredients - Food Gypsy Mixing, takes some time - Food Gypsy

Adding the hot oil & liquid to make it foam - Food Gypsy Place your pears - Food Gypsy Allow to cool - Food Gypsy

Asian Gingerbread Pear Cake Recipe

Preparation time: 30 minutes
Cooking time: 70 minutes

Poached Pears (adapted from Ricardo Larrivée)

3 Asian pears, ripe but firm, with stems
Juice of 1 lemon
6 cups water
1 1/2 cups sugar
2 teaspoons lemongrass powder (or 1 stick of lemongrass)
1 cinnamon stick

Asian Gingerbread (adapted from Blue Kitchen)

1-2/3 cups flour
1-1/4 teaspoons baking soda
4 teaspoons ground ginger
1-1/4 teaspoons cinnamon
1-1/4 teaspoons five-spice powder
1/4 teaspoon fresh ground black pepper
1/2 teaspoon salt
1 egg, lightly beaten
1/2 cup white sugar
1/2 cup molasses
1 teaspoon vanilla
1/2 cup plus 2 tablespoons poaching liquid, boiling
1/2 cup vegetable oil, plus oil for the pan (if needed)

Method:

Poached Pears -
1.  Peel the pears, leaving the stems in place and the pears whole.  Working from the bottom, core the pears using a melon baller.  Place the pears in a bowl and sprinkle with lemon juice.  Set aside.

2.  Place the water, sugar, lemongrass (powder or fresh) and cinnamon in a saucepan and bring to a boil.  Add the pears and the remaining lemon juice. With the syrup barely simmering, poach the pears until tender, 10 to 15 minutes.  Transfer to a bowl and let cool to room temperature.

3.  *Set aside 1/2 cup plus 2 tablespoons poaching liquid.*

Asian Gingerbread -
1.  Preheat the oven to 350ºF.  Prepare loaf pan by oiling the bottom and sides or  line with parchment.

2.  Grind the pepper if needed.  Fresh ground pepper is preferred as it has all it's oils intact.

3.  In large heatproof bowl, sift the flour, baking soda, ginger, cinnamon, five-spice powder, pepper and salt.

4.  In a separate medium bowl, whisk egg, then add sugar, vanilla and molasses and mix well until smooth and shiny.

5.  In a small saucepan, combine oil and reserved poaching liquid over low heat.  If it begins to boil before you are ready to add it, turn off the heat (or it may boil over).

6.  Pour the egg-sugar-molasses mix into the dry ingredients.  Stir thoroughly.  It will resist you and at first, but put some muscle into it and it will soon come together into a stiff batter.

7.  When the batter is thoroughly mixed, bring the oil-and- poaching liquid to a boil and pour it quickly (all at once) into the batter. This activates the baking soda and makes a fizzy, foamy batter.  With a wooden spoon or whisk, stir thoroughly until the batter is smooth. The batter will quickly become shiny and rather liquid.

8.  Pour about 1/3 of the batter into the prepared loaf pan then place poached Asian pears in pan, stem up, at an equal distance apart. Spoon remaining batter into pan around pears, leaving stem exposed and place in the preheated oven on the center rack.  Set a timer for 40 minutes and test.  it may need more time depending on the water content of the pears.

*The cake is ready when a tester inserted near the center emerges with just a few crumbs on it, and it has begun to pull away from the sides very slightly (also, the top may crack as it bakes, don't panic).*

9.  Cool the cake in the pan on a rack. Run a pairing knife around the edges to loosen before removing from the pan (or lift gently with the edges of the parchment).

Carefully remove and plate, cutting each slice to expose the pear.  Serve warm or cool.  Enjoy.


Asian Gingerbread Pear Cake - Food Gypsy

Double_Dark_Chocolate_Raspberry_Cake_slice

"Chemically speaking, chocolate really is the world’s perfect food." ~ Michael Levine, nutrition researcher.

What is life without chocolate?  Horror of horrors.  Don't even think it.  It is too hideous, look away, look away.

Chocolate is something of a religion for me.  A sacred bond.  A covenant betwixt me and the glorious bean that is Cocoa.  It has seen me through abandonment and depression and heartbreak and a tax audit that nearly broke my bank but never broke my spirit because I had chocolate; and in chocolate there is courage.

Yes.  We have been through much, chocolate and I.  In the summer of 2008 I found my way through extraordinary circumstances by paying homage to that dark, rich taste by means of perfecting a chocolate cake.

Based on a recipe from Brigeten's Restaurant, in New Orleans published in Bon Appetit magazine's R.S.V.P. section (April 2008), it was juggled and shuffled to find my personal sweet spot.

Thus my Double Dark Chocolate Raspberry Cake was born.   It was a messy beginning.

Past staff members at the Dragonfly Inn can attest to the many stages of its development (and the thunder thighs) until finally I found balance and --- dare I say it --- elegance.

Visionary that I am... I added more chocolate.  I know.  Ground breaking.  Oh, and raspberries.  Prepare yourselves.

Double_Dark_Chocolate_Raspberry_Cake_top

Let's be honest; this is not a quickie recipe. It will goo-up a minimum of eight bowls, two saucepans, a couple of racks and several utensils.  The frosting will splatter, there may be icing sugar and cocoa powder air-born, the batter is a precise science and it will not tolerate mistakes.

This is a cake that takes time, patience and effort.  Therefore I only make it for those who will not just appreciate, but worship it.  The slightest variance from which turns me into the Cake Nazi:

"NO CAKE FOR YOU!"

Because when it's finished, those whose lips it touches will thrill to a rich, yet light old-fashioned cake that crumbles under the fork, a hint of ripe, sharp raspberry and a smooth, semi-sweet whipped icing, that cranks the sweet tooth of a mature palate.

The good news; you can make it well ahead.  Using a simple syrup on the cake base, it keeps for as long as five days in the fridge, still moist.  Simply let it stand at room temperature for an hour and --- voila.

Often, I cut the cake rounds in half to create a four layer cake. I opted not to do that this time as I wanted a loose, friendly cake - reminiscent of Donna Reid and the 1950's. So I wore pearls and high heels with my polka-dot apron and gobbed on the southern style frosting, made with sour cream, with a big spatula.

I filled the centre with far too much raspberry preserve, letting it gush down the sides, oozing red, ripe flavour, only to stop the hemorrhaging with more icing so that it might be somewhat contained and absorbed by the layers.

Southern_style_icing_ripe_raspberry

A certain dog just loves it when I bake. Chocolate is not for dogs Mags.

Allowed it to chill for an hour to make it firm in the heat and topped with violets from our garden.

I let it be juicy and messy and completely wonderfully imperfect because I find that so magnificently --- delicious.

Then... I licked the bowl.

Batter, three bowls... Beat your butter... Double Chocolate Raspberry Cake - just the cake

Brush cake with simple syrup. Raspberry filling, just jam and berries. Dark chocolate icing.

Double Dark Chocolate Raspberry Cake - Recipe

Prep / Cool/ Finish Time: 3 hours

Baking time: 20 - 25 minutes

Ingredients (cake):

• 2 cups sifted cake pastry flour

• 1 teaspoon baking powder

• 1/2 teaspoon salt

• 2 cups icing (powered) sugar, divided

• 1 1/4 cup buttermilk, divided

• 2/3 cup unsweetened cocoa powder

• 1 teaspoon vanilla extract

• 1/2 cup unsalted butter, room temperature

• 2 large eggs

Ingredients (icing/filling):

• 3/4 cup water

• 1/2 cup sugar

• 1/2 cup raspberry preserves

• 1/4 cup fresh raspberries

• 3/4 cup unsalted butter, room temperature

• 1 cup sour cream

• 2 1/4 teaspoon vanilla extract

• 2 cups icing/powdered sugar

• 1 1/2 cups unsweetened cocoa powder

• 8 oz semi-sweet dark chocolate

• 1/2 cup whole milk

Pre-heat oven to 350*F

Butter two 9-inch cake pans with 1 1/2-inch sides.

Dust buttered pans with powdered sugar.

Line bottoms of pans with parchment paper cut to fit.

Method (cake):

1. Sift four, baking powder & salt into one medium bowl.

2. Whisk 1 cup icing sugar, 3/4 cup buttermilk and cocoa powder in second bowl, until just smooth.

3. Whisk remaining 1/2 cup buttermilk and vanilla in small bowl.

4. Using electric mixer, beat butter in large bowl until creamy. Add remaining icing sugar; beat until smooth. Add eggs, one at a time, and beat until blended. Beat in coca mixture. Add flour mixture, 1/3 at a time, alternating with buttermilk vanilla mixture. Beat until just mixed.

5. Divide batter into the two prepared pans. Batter can be quite stiff, you may need to smooth it into place to get an even distribution of batter so cake rises well.

6. Bake at 350* for approximately 25 minutes, until teaser inserted in middle comes out clean.

7. Cool on racks 15 minutes. Run a knife around edges to loosen any sugar adhering to pan and invert cake onto rack to cool completely.

GYPSY NOTE: Cake can be made 1 day ahead, cover and store at room temperature.

Method (icing/filling):

1. Bring 1/2 cup water & 3/4 cup sugar to fast boil over high heat, boil 2 minutes, remove immediately from heat, creating a simple syrup. Cool. Reserve.

2. In a small bowl combine 1/2 cup (good, clear) raspberry preserves/jam with fresh raspberries.  Crush lightly with a fork.  Leave slightly lumpy.

1. In large bowl use electric mixer to beat butter until smooth.  Beat in sour cream and vanilla.

2. Melt chocolate either over a double boiler or in the microwave, allow to cool slightly.

3. Add icing sugar and cocoa powder to butter mixture with electric mixer.

4. Slowly drizzle in melted chocolate at high speed until icing is whipped and light.

If you desire a four layer cake, cut cake rounds horizontally.  Place one layer of cake on serving plate.  Brush with 3 tablespoons of simple syrup.  This is the key to this cake's longevity and moisture.

Spread 1/2 cup of icing over cake.  Repeat with next layer in same manner, simple syrup, icing and now adding raspberry filling before adding 3rd layer and repeating process.

This cake has been a superstar of many a birthday, and it marks my one year Food Gypsy Birthday!

A year ago, on the shores of Roatan Honduras this little blog was born. We've come a long way since, it's been a great adventure and it's a great LIFE.  I made it myself, from scratch.

I honour this journey --- with chocolate.


Double_Dark_Chocolate_Cake_Full

Lick my wisk

It's a glamorous life, this food thingy.  It's all champagne and unexpected phone calls from editors at Bon Appetit magazine and offers from the Food Network and everything you cook is perfect every single time. 

Not.  The reality is quite different from the fantasy.  Not bad, just different.

Truth be told, creating new recipes or even putting a fresh spin on an old favorite requires, at times, a considerable amount of experimentation to get to a flawless result.

Like anything else in life, be it art or love or music or sport; to get really good at something requires practice, a measure of trial and error and learning from our mistakes.

Yesterday I began a cake.   This is a cake I spent the entire summer of 2008 perfecting, jigging and rejigging. 

Past staff members at the Dragonfly Inn can attest to the many stages of its development;  from dry and pale, to overly moist and too sweet, to too gooey (with added chocolate bits) until finally I found a balance that is a rich, moist cake, so dense that it crumbles under your fork  and a smooth, under-sweet frosting, that thrills the sweet tooth of a mature palate.

That was before a bit of culinary EDU and now I look at my recipe and think:

"Knowing what I know now, how can I take it up a notch?" 

Which means moving back to the 'great ideas in desserts' file and shifting the recipe once again.

Like all good things... this takes a bit of time.  I truly LOVE to bake, it is the science of the culinary arts.  Unlike cuisine, pastry is exact and one little error can create disaster in the kitchen.

Sugar is a much more demanding mistress than salt.

Salt will forgive, salt will dilute, salt has much more flexible boundaries.  Not sugar.  Her properties are exact and rigid. Know them and work within them and you can create a masterpiece. Ignore them, and --- catastrophe.

Let us not cast dispersions on salt, for with salt there is FIRE.   Salt & I have had our share of disasters.  Some you hear about and some you don't, or haven't, yet.

Case in point: the rib recipe that I've been perfecting since February, not just in favour but in technique, for 'wow' results.  I've batched the sauce six times, alternately steamed, boiled, and brined the ribs to prep for the grill.

They have been (at various stages); tough, tasteless, too salty and good but not great.  The notes run on to six pages, now I think I have it.  We will know for sure next week if they pass the Chef B test.

They don't call me "Princess Rib-Curry" for nothing!

Gypsy Ribs - Version III

Gypsy Ribs - Version III. Good but not great; meat was dry and the sauce lacked brightness. Back to the kitchen it goes.

Or the apricot chutney recipe, which (despite proportions being correct) was far too acidic. One may have been a bit heavy handed with the currents, rustling in a condiment that was too strong on the 'pucker power' and whose aesthetic resembled a beautiful amber base, with addition of mouse turds.

Not really what I was going for.  So --- adjust and re-test and until it is JUST RIGHT --- keep it in the kitchen.

Indian Pork & Apricot Chutney Sandwich - version 1

Indian Pork & Apricot Chutney Sandwich - Version 1. Close by no cigar... back to the kitchen it goes.

Salt demands immediacy and response.  Sugar demands patience and timing.

Thus the reason I never rush a cake.  Sugar does not like to be rushed.  She likes to take her time.  She commands respect and discipline and in exchange she brings divine pleasure to your life.

It is worth acknowledging that we are half-way to where we want to be.  It keeps us moving forward to our final destination.

The final results will be ready this afternoon, appropriately adjudicated by a willing test subject, then lovingly transcribed for readers.  Prepare yourselves for Double Dark Chocolate Raspberry Cake, tomorrow. 

Pure pleasure in chocolate form, from the Gypsy Kitchen.  Unless of course --- I get spanked by sugar.

Double Dark Chocolate Raspberry Cake - just the cake

Double Dark Chocolate Raspberry Cake - just the cake. Sugar, you Divine Goddess you...

Chocolate Whiskey Cake

This could very well entice a leprechaun into exchanging his pot of gold for a slice of chocolate sin.

A dense, rich, dark chocolate cake that is moist and not too sweet, with that bite of good, clean whiskey and a hint of walnut. A very 'grown up' brownie.

This Chocolate Irish Whiskey Cake recipe comes compliments of the LCBO's (Liquor Control Board of Ontario) Food & Drink magazine, Autumn 2010 edition. But it's not exactly as described in those glossy pages.  The cake is the same, picture perfect and truly sensational but...

The 'icing' featured in Food & Drink (2 oz chocolate, 2 TBS whiskey, 1/4 cup of butter) broke... TWICE.

Every ounce of expertise I have went into that effort, though even when I first read it I thought "hmmm... that's an awful lot of butter, just what am I supposed to emulsify it with?  There's not enough to bind it to."

I put my concerns aside and tried it.  When it failed the first time I was even more determined to get it right the second time.

I babied it back and forth between the double boiler and the ice bath, whisking constantly, delicately melting in the butter only to wind up with a grainy, bitter, oily mess.  TWICE.

I hate wasting butter.
Almost as much as I hate wasting chocolate.

Besides it was WAY too boozy. (I know... too boozy for ME, almost unheard of.)

I feel compelled, at this juncture to assure you I was not in fact 'sampling' the whiskey (not that there's anything wrong with that, just ask Julia Child.) Had I been sampling, I assure you, the cake would have been tossed, rather dramatically out the window, aiming for the parking lot.

In consultation with our Technical Advisor, Chef Benoit, I considered changing the process (melting the butter and the chocolate together instead of the chocolate and whiskey) and adding an egg yoke, then flavouring (to taste) with the whiskey. This would have corrected it to a consistency closer to what I was looking for, a smooth drizzle.

But as we have yet to kitchen test that, we switched the recipe to include a ganache, a simple cream and chocolate that is silky smooth and won't let you down.

That way you can finish the top and have that 'brownie' effect.  Leprechaun Brownies.  It's my new thing.

One of the reasons I test every single recipe --- no matter what, is because it should be consistent every single time.  I would hate for you to be as cranky as I am right now.  Chocolate cake should make you happy... not cranky.  Maybe what I need is a piece of cake.

Oh... look... leftover whiskey.  Well, I am (part) Irish.   Happy St. Patrick's Day.

Here's mud in 'yer eye!

Butter & Sugar Pan Lightly toasted walnuts Pulverizing the walnuts

Mmmm.  Espresso. Irish Whisky... it's good for ya'. Espresso & Chocolate & Whisky... someone has to...

Mixing, butter, sugar, vanilla... Batter in pan, oven ready. Cooling on the rack.

Chocolate Irish Whiskey Cake - Recipe

  • Ease of preparation: Easy
  • Time required: 90 minutes
  • Serves: 8

Ingredients:

  • 1/2 Cup Irish Whiskey
  • 6 Ounces bittersweet (70% cocoa) chocolate, chopped
  • 1/3 Cup espresso (or strong coffee)
  • 1/3 Cup toasted, ground walnuts
  • 1/3 Cup all-purpose flour
  • 1/2 Teaspoon salt
  • 1/2 Cup unsalted butter, softened
  • 1 Tablespoon vanilla extract
  • 1/2 Cup sugar
  • 3 Eggs, separated

Chocolate Ganache

  • 3/4 Cup whipping cream
  • 6 Ounces bittersweet chocolate, chopped

Method:

  1. Preheat oven to 350*F (180*C).  Butter and sugar coat 8-inch springform pan.  Set aside in fridge to cool.
  2. In sauce pan, bring 1/2 cup of whiskey to boil, reducing by half (approximately 3 minutes).  Transfer to metal bowl, add chopped chocolate and espresso.  Place bowl over sauce pan of simmering water and stir until mixture is smooth, about 2 minutes.  Remove bowl from hot water and reserve.
  3. In small bowl mix together flour, walnuts and salt - reserve.
  4. Using electric mixer. beat butter, sugar and vanilla until light and fluffy.  Beat in egg yokes, one at a time, mixing well after each.  Gently fold in chocolate mixture with spatula.
  5. Using clean, dry attachments, use electric mixer to beat egg whites to stiff peaks.  Fold 1/3 egg whites and 1/3 flour mixture into chocolate batter, follow in same manner, mixing 1/3 at a time until batter is mixed.  Transfer into prepared pan, gently smoothing the top with a spatula.
  6. Bake in centre of oven until tester inserted into center of cake comes out clean --- approximately 30 - 35 minutes.
  7. Cool on rack for 10 minutes, then move to fridge to chill for 20 minutes.
  8. For ganache:  Heat cream in a saucepan over medium heat and bring to a boil.  Remove from heat and add chopped chocolate.  Allow to melt slightly then stir until glossy and smooth.  Spread over chilled cake to approximately 1/4 inch thick.  Then refrigerate again to set (15 minutes), then remove springform collar.
  9. Serve to leprechauns.

As we were going for a drizzle, we originally unmolded the cake to cool, upside down.

The effect of a sugar coated pan makes a lightly caramelised effect --- something we were planning to highlight with a fun bit of plating.  Cue broken sauce.  Cue new application of ganache.  In the method notes we suggest your apply the ganache with the pan collar still attached so you can get it right to the edge and create a dramatic line.

What to do if you have leftover ganache?  Allow to cool, roll into balls and cover in cocoa and you've got TRUFFLES.

Or, eat with a spoon.  (It's just what I've read...)